Browsing through my old e-mails found this quality little gem sent by the Engineering Department Master Chief, one of the higher ranking officials on the USS Enterprise (CVN-65), MMCM Phillips. This is one reason why I left the Navy, to have the option to quit when yelled at for someone else screw ups:
"Subject: Liberty call is 1800...
Message: for all CPOs, LPOs, and WCS until SFIMS is un-screwed. I and the CHENG are here going through this @#% database and frankly, it is not our job. There are almost 300 late to start jobs. Be prepared tomorrow to explain each one to me. We will meet at 1600 in the RT upper trailer. CPOs, WCS, LPOs all present.
-EDMC"
Translation:
Subject: You can't go home until 6pm
Message: For all cranky old leaders, cranky young leaders, and 18years olds with enough brains to be in charge of a work shop, until our work tracking database is not *bleeped* up any more (you can't go home). Me and the guy who is my boss are going through this *bleeped* database and we shouldn't have to even though we are responsible for the entire Engineering department. There are almost 300 late start jobs (the database tells me an exact number but I choose to round up to sound important). Be prepared tomorrow to explain each one to my grumpy face while I ignore your legitimate reasons and then make you feel stupid for each one. Even though I said tomorrow I want all of you to be in this portable trailer to yell and scream even to make my self feel better. Everyone will be present.
PS: I am showing total dis-regard for you and your family, and I don't care at all if your work center has done it's job and you have done your job, you will be yelled at along with everyone else.
PSS: Have a nice day shipmate...
-Matt
Wednesday, December 7, 2011
Sunday, September 11, 2011
Our other journal
Just wanted to let everyone know that we are going to be documenting our progress of our bike ride from the Canadian border to the Mexican border on a cycle site:
http://www.crazyguyonabike.com/doc/PM2011
you can follow along with us there if you care to =)
-Matt
http://www.crazyguyonabike.com/doc/PM2011
you can follow along with us there if you care to =)
-Matt
Wednesday, August 17, 2011
We are doing it!!!
For those of you who have known us for any amount of time, you know that Matt and I were planning on taking a *small* bike trip across the country last year. Our plan was to ride from Virginia to Washington (state) and then maybe on down to California. Well, those plans were dashed/put on hold when Matt got his most excellent job right away after the navy. So....fast forward to just a few weeks ago, when Matt was looking at the time he has available to take off from work, kind of a use it or lose it situation. He had several weeks saved up, so.....we decided we are finally going to go on our bike tour!!!! Our plan is to ride from Canada to Mexico, along the Pacific coast. Just shy of 2000 miles. :) In September, we'll fly to Seattle, hitch a ride to the border, and begin our journey, hoping to finish up by November. I'm getting super excited. We were looking at the gear we have for the trip last night, trying to think of what else we need to buy, and it started to hit me. This is going to really happen! We'll be camping out most of the way, and expect to take about 5-6 weeks to complete the tour. If we can average 50 miles a day, we'll be golden! Our plan is to take all our camping gear on our bikes, and only stay in hotels once a week or so. Crazy, huh?
Anyways, sorry that my updates have been sporadic at best. I'll have to get Matt to show you pics of the bathroom, since it turned out fantastic. Still some finishing work to be done. Oh, and we had lots of family visit, which was pretty awesome, too. Gwen is starting to settle in (she's living with us now) and it already feels like the natural thing, having her here ;)
Well, that's about it. Should get started on dinner, soon.
~Pam
Sunday, May 29, 2011
U-Socket Vampire Power Draw
A company called FastMac has released a product called a "U-Socket" (link) which is a power outlet with two usb outlets on it for charging any devices that accept this method of charging (most new cellphones, tablets, etc.) One of the largest concerns with this method is that you can never unplug the usb power adapter, so there will always be some energy draw. I was concerned with the energy draw and wanted to compare it to my HTC EVO's standard USB adapter.
U-Socket Draw with nothing plugged in: .8ma (.8ma x 115V = .092Watts)
HTC USB adapater with nothing plugged in: 2ma (2ma x 115V = 0.23Watts)

In conclusion FastMac did a very nice job of keeping the Vampire draw to a minimum. You are looking at almost a year and a half before it uses 1 kwh, so this convenience is costing me less a penny per month in wasted electricity.
As for the installation I had no problem cramming it in to an old box that is original to my house, but your mileage may vary, the outlet is huge compared to a standard one. If you don't feel comfortable with the fact that electricity can kill hire some one to do it for you.
-Matt Emerson
Sunday, May 15, 2011
Dear NRA...
We get called by the NRA 1-703-291-9005 multiple times each day, and they just hang up on us over and over again. I can't even hear their message or ask to be removed, so what I have decided is that every time in that NRA's lousy automated system calls me I am going to donate to The Brady Campaign Against Gun Violence (http://www.bradycampaign.org/) which is as close to the exact opposite of your groups beliefs that I can find. So please keep calling me and hanging up, and I will keep donating to the people you oppose.....
-Matt
-Matt
Saturday, May 14, 2011
Two Summer Dresses
Ok, so the other day, I was inspired when I saw this dress by EmersonMade, a clothing company that just happens to have a similar name to me, no relation ;) I saw the dress and thought "I think I could make something similar." That looks like a button down shirt turned dress. So, Matt and I went shopping at my favorite Thrift Store, and came back with two Extra Large men's button down shirts. These things were HUGE! I started out with the short sleeved shirt, which was huge. I don't have many pictures, because I wasn't sure how it would turn out.
This is what I started with.
 And here's the other long sleeved shirt to start with.
 These pictures are horrible, I know. But my husband was either sleeping (he was working the night shift) or working (working a double shift) so I had to take them myself in the mirror. But, you get the idea, right? I made sure the shirts were long enough to make a decent length dress.
The first thing I did was cut the sleeves off. They're ungainly and make it hard to fold the shirt in half to cut it.
For the plaid dress (the first one I did), folded the shirt in half, laid a tank top over it as a guide for the top, traced around it, and cut out a dress shape. For the second dress, I laid the first completed dress on top as a guide, since I already knew I liked the shape.
 Then, I pinned up the sides, to make sure it fit nicely, and here's a picture of that.
 Then, I sewed up the sides, making sure to leave the arm holes open ;) (sometimes I forget, but that's what a seam ripper is for, right?)
I still wasn't quite happy with how it fit, so I had to sew two darts on the back (of each dress, coincidentally). I used this tutorial. And this one. It made the fit just that much better. The last step is finishing up the arm holes and the neck holes. I just folded over and sewed :)


 For the plaid dress, I had to do a little extra: I didn't like how "loose" the button line was, I felt like the dress was going to blow open on me. So, starting halfway down the dress, I topstitched it closed (halfway down, so I could get the dress on over my hips.). I didn't need to do it with the purple dress. It was pretty secure. Also, with the plaid dress, I cut a "v" in the back so I can move a little more freely. It ended up tighter than the purple, which doesn't need a "v"
I'm really happy with how they turned out. When asked, my husband said he couldn't believe I and made them, and they definitely didn't look like they used to be men's shirts either. :) I'm thinking of changing out the buttons to something more exciting than small clear buttons...something fun, perhaps?
~Pam
This is what I started with.


The first thing I did was cut the sleeves off. They're ungainly and make it hard to fold the shirt in half to cut it.
For the plaid dress (the first one I did), folded the shirt in half, laid a tank top over it as a guide for the top, traced around it, and cut out a dress shape. For the second dress, I laid the first completed dress on top as a guide, since I already knew I liked the shape.


I still wasn't quite happy with how it fit, so I had to sew two darts on the back (of each dress, coincidentally). I used this tutorial. And this one. It made the fit just that much better. The last step is finishing up the arm holes and the neck holes. I just folded over and sewed :)


I'm really happy with how they turned out. When asked, my husband said he couldn't believe I and made them, and they definitely didn't look like they used to be men's shirts either. :) I'm thinking of changing out the buttons to something more exciting than small clear buttons...something fun, perhaps?
~Pam
Friday, May 6, 2011
My {first} Pillow!
Ok, here she is. My first pillow. :)
 I love it.Want to know how I made this? Well, I got the inspiration from the crafty cpa. The paper she used was so cute, and totally inspired me to do something like that. Of course, I had to do my own take :) I'm new to making pillows, and this was a great first project for me.
Ok, so this is ridiculously easy. Here's what you need:

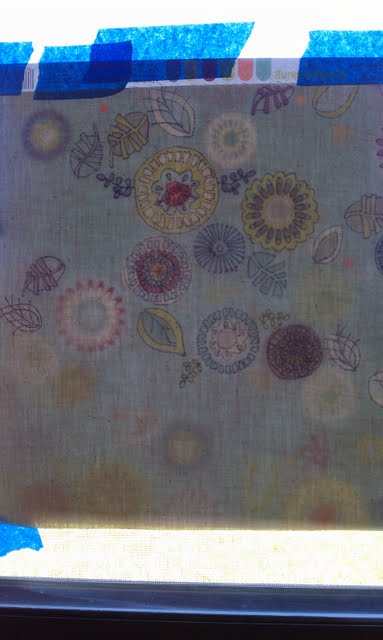
Next, you'll need to trace the design onto your fabric. Now, the crafty cpa used a light box to trace her paper, but I don't have a light box. I simply taped the paper to the window, and then the fabric over it. Like so...
 You don't have to trace it all, and you don't have to stick with the design of the paper. I liked the flowers of this, but thought some of them were too busy for what I was going for. I traced around the outside of them, and put them all in a line, at different heights. I had to extend the stems of some of the flowers, and add leaves, but that wasn't too hard.
Once you have the design the way you want it, shade as needed. I traced in yellow around the flowers, and traced the stems and leaves in green.
Now, make your pillow. I just put right sides together, pinned, sewed around three sides and most of the fourth side, leaving enough to turn inside out. I ironed the seams down, and turned it. I filled with fiber fill, trying to make sure my pillow wasn't too lumpy. Then, I hand-sewed the opening shut. And Viola'!
 A nice, fun pillow. Might make a good mother's day gift. Super easy, fast, and fun! :) Oh, and this pillow cost me probably about $1 total. :)
~Pam
Linking up:


Ok, so this is ridiculously easy. Here's what you need:

- semi-see-through fabric (I used muslin. I got it at JoAnn's for about $1.79 a yd)
- cute scrapbook paper, with a design you like (this paper is for a different pillow I'm making)
- sharpies (ultra-fine tip for the tracing, fine tip for the shading)
- sewing machine (and needle and thread to hand stitch up the opening
- fiber fill (or pillow form)
- iron
Next, you'll need to trace the design onto your fabric. Now, the crafty cpa used a light box to trace her paper, but I don't have a light box. I simply taped the paper to the window, and then the fabric over it. Like so...
Once you have the design the way you want it, shade as needed. I traced in yellow around the flowers, and traced the stems and leaves in green.
Now, make your pillow. I just put right sides together, pinned, sewed around three sides and most of the fourth side, leaving enough to turn inside out. I ironed the seams down, and turned it. I filled with fiber fill, trying to make sure my pillow wasn't too lumpy. Then, I hand-sewed the opening shut. And Viola'!

~Pam
Linking up:
Wednesday, May 4, 2011
Clothespin Holder {A Mother's Day Tribute}

My Mom, last year at Lindsay's wedding
Isn't she beautiful?
Isn't she beautiful?
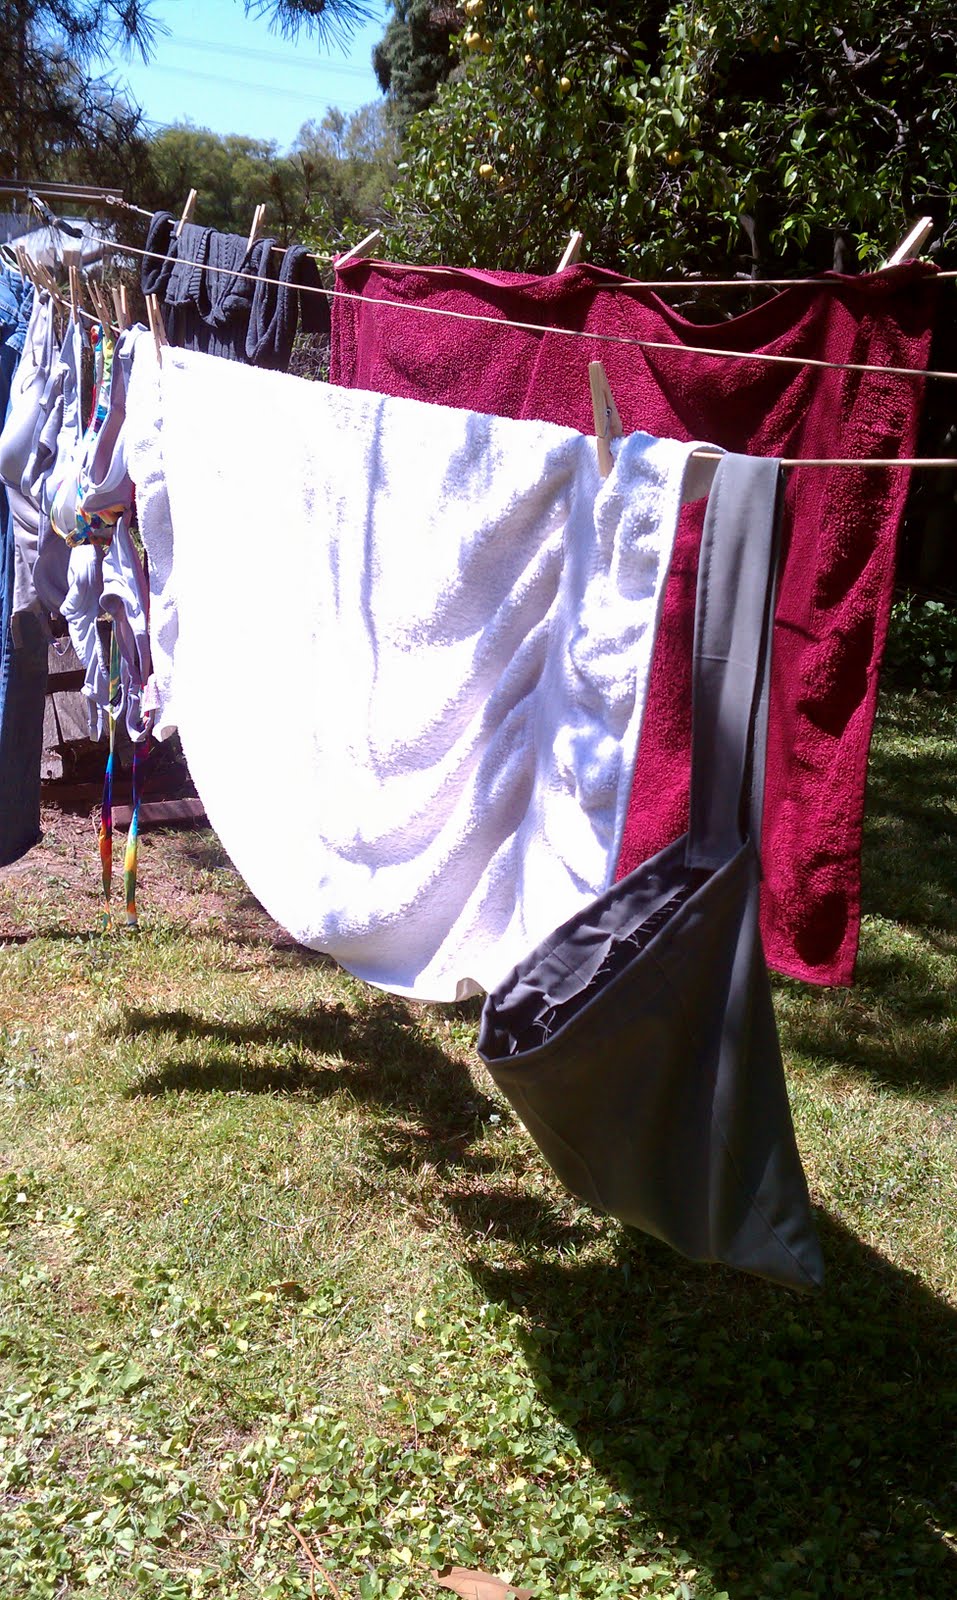
I remember growing up in Menan, and every spring/summer/fall my mom would hang laundry up on the line. I remember there always being clothes on the line, drying. With 8+ people in the house at any one time, there was always tons of laundry to do. Our clothesline was huge. The lines were long and very sturdy. They seemed to be really high, too, but that might be because I was so little when we lived there. I especially liked to help out putting up towels or taking them down. They were the easiest! I remember having to run out and bring them all in really quick when an afternoon thundershower would roll through, which happened often enough. Yes, the clothes, especially the jeans, ended up slightly stiffer than they would coming out of the dryer, but nothing beats the smell of fresh laundry, right off the line. So, Mom, this post is for you! Happy Mother's Day :)
Now that it is May, and my husband set up the clothesline, I decided I wanted to start drying clothes out on the line. Yesterday I ended up doing two full loads of laundry, and drying them on the line. It was so warm and dry outside that I think it took less time for most of the clothes to dry than it would have in the dryer :)
Here's my clothesline. There are three lines at the moment, but there's room for two more...I'm thinking I'll have Matt hook me up and put up the last two lines :)

I got some ideas from one of my crafting newsletters. Yesterday's post was all about clothespin holders. I decided on this idea, using a placemat to make a holder. Unfortunately, I couldn't find a placemat that I wanted to use, so I actually used some of my scraps and used a pant leg from a pair of old pants of Matt's.
First, I cut out a section of the pant leg. I didn't use the very bottom, although that would have been nice since there's already a seam there...but, no, I decided it wasn't a big enough "pocket". I turned it inside out, sewed the bottom (in this case, the skinnier side. The pant leg kind of tapered, and I wanted the wider side to be the opening.), and turned it right side out. I wanted the seams to look sort of finished, so I folded down the top, and topstitched one line all the way around. Then, I turned it inside out, and stitched close to the "cut" edge. {Does that make sense?} I have black thread in the top of my machine, and gray thread in the bobbin (don't ask) and that makes for some varied stitching :) You can see in the picture it is still a little raw, but I figured that would be ok.

See the two different colored stitches?

Ok, for the handle, I took a 2 1/2" section of the pant leg, cut it down to where I thought would make a good handle, sewed around all the edges. Then I sewed it onto the back of the bag. I used a zigzag stitch, plus topstitched with a straight stitch all around the edges. I want to make sure that baby stays on! I then attached velcro to the inside, right on top of where the handle attaches. I put the other side of the velcro on the end of the handle.
All in all, this took me about 20 minutes, and by the time the clothes were done drying, my clothespin bag was ready to hold clothespins for me :)
There it is :) I like this idea better than the ones with a clothes hanger to hold it on the line, mainly because I don't have any clothes hangers, and also because it will NOT fall off the line :) I slide it right down the line with me as I go, and it makes my life easier! I don't think my mom ever had a holder, or at least I don't remember one. The pins would just stay on the line, spread out, and they'd be there to use as needed. Maybe it didn't get as dusty in Menan as it does here in LA, but I'm thinking that to keep my pins clean, I'll need to keep them inside :)
One thing I kept thinking as I was hanging the clothes out was that the energy that was drying the clothes was totally free. Love it!
~Pam
Linking Up!

Sunday, May 1, 2011
May Day Garden Update
Happy May Day everyone! {Or Beltane, if you prefer :}
So, I decided that a pictorial update on the garden might be in order. Most of this stuff I planted back in February, and have been continuously adding since. So, without further ado, here it is...My Garden :)
Here's looking out at the 4 raised beds in the yard.
 Here's some closeups: This is watermelons and cantelopes.
 Here's yellow squash, zucchini, and winter squash, plus some romaine lettuce.
 Matt's Amarinth and tomatoes.
 Matt's corn. It's going crazy!
 The newest bed: strawberries and herbs.

Here you can see strawberries in the foreground, and two types of basil and rosemary in the background.
 More strawberries. I planted 18 strawberry plants. Some of them are runner producing, some aren't, but they are all everbearing. I counted 12 strawberry fruits growing just today!

 Here we have romaine lettuce, onions, peas, marigolds, and some sprouts of something...can't remember right now!
 Here's some beans, peas, radishes, lettuce, and a few carrots.

 I was trying to help out one of the plants today that had fallen over in the wind, and I actually skewered a new potato, so I decided to harvest them :)

Don't they look yummy! I'm actually going to roast them in the oven right now, and we'll eat them with some grilled chicken and sauteed asparagus that we got from our shipment of veggies from Farm Fresh To You. What a neat company. We get a box about once every 4 weeks, and it's only $31.50. Can't beat that for organic produce right to our door. We love it! :)
Anyways, I need to get dinner going, so I'll wrap this up. Hope you enjoyed reading about my garden. I'm lovin' it!
~Pam
So, I decided that a pictorial update on the garden might be in order. Most of this stuff I planted back in February, and have been continuously adding since. So, without further ado, here it is...My Garden :)
Here's looking out at the 4 raised beds in the yard.


Here you can see strawberries in the foreground, and two types of basil and rosemary in the background.


Here's the original square foot garden from this past fall/winter. There's a lot going on :)


And, the pie'ce de re'sistance: Potatoes. :)


Don't they look yummy! I'm actually going to roast them in the oven right now, and we'll eat them with some grilled chicken and sauteed asparagus that we got from our shipment of veggies from Farm Fresh To You. What a neat company. We get a box about once every 4 weeks, and it's only $31.50. Can't beat that for organic produce right to our door. We love it! :)
Anyways, I need to get dinner going, so I'll wrap this up. Hope you enjoyed reading about my garden. I'm lovin' it!
~Pam
Saturday, April 30, 2011
What I've been working on...
Ok, so after the skirt I made earlier this week, I decided to take a little break from sewing, and work on some other projects. Here's a bit of what I've been working on:
I just finished crocheting this beanie :) Love it! It was a really simple pattern that I got for free from Lion Brand Yarn. Took me just a few hours; I worked on it a little bit last night and finished up this afternoon. Nice!
 {P.S. I look like a dork. I know. I can't help it! This is what I get when I take a self portrait :}
This is a project that I started. I saw a tutorial on turning scrapbook paper into fabric pillows, using a lightbox and tracing {obviously I don't have a lightbox. I taped it all to the window and traced away!}.
 I've gotten to the point where my tracing is done, but now I have decisions to make on how to finish the pillows. This is only 12x12 square, which I think would make smallish pillows, so I think I'm going to have to relearn how to quilt and add a border all the way around to make it bigger before I make it into a pillow...more to come later!
This necklace is made out of magazine paper, rolled into beads. I tried to find colors from the magazine in similar shades, and settled on the yellow/orange tones. I actually like it a lot, and it didn't take me that long to make it, either. I just strung it on a piece of yarn, so it's not going to last forever, but, hey! I'm alright with that. This magazine would have ended up in the recycling anyways :)

 One more project I'm working on is a waste basket made from magazine pages...I don't have a picture since I'm in the very early stages, but here's a link to where I got the inspiration. Because there aren't instructions on how exactly she made the basket, I'm kind of making it up as I go along. I'm not quite sure I like where it is going...it might just turn into something else. It is taking me a long time, and I'm not quite sure I have the patience.
My Grapefruit Essential Oil experiment is coming along. The grapefruit peels are drying; it is taking a while, but that is to be expected. Every once in a while I get a whiff of grapefruit somewhere in the house and it makes me smile; I know where that's coming from! :)
Oh, did I mention that I won two different giveaways? Last week I entered a bunch of giveaways for fun, and I actually won. Twice! I never win anything! The first thing that I won was a sample of Shaklee Basic H2, which is an organic super cleaning concentrate. I won it in a giveaway from Someone's Gotta Pay.
 From the packaging: "Inside this tiny capsule is enough power to make a whole bottle of all-purpose super cleaner and another bottle of glass cleaner-16 earth-loving ounces each." Basically you use 2 drops mixed with 16 oz of water for glass cleaner, and the rest of the little bottle (about 1/4 tsp) with 16 oz for the multi-purpose cleaner. I have to admit I haven't tried it yet, because I don't have spray bottles, but I'm looking forward to trying it out.
The second giveaway was from one of my favorite crafting sites: Chica and Jo. They were doing an Earth Day giveaway, and I was one of the winners! I got this awesome sketchbook and journal :) They make me happy!
 Don't mind the mess all around. My desk is driving me nuts and I'll get to it soon.
So, about the sketchbook. From the packaging:
"The Sketchbook is made from 100% post consumer recycled paper. 100% Made in the USA
The Cover is 100% recycled board covered with 100% recycled post-consumer recycled paper stock, dyed with vegetable based ink.
The Paper is 100% post-consumer, acid-free, Process Chlorine Free paper stock. Printed with vegetable -based inks and bound utilizing environmentally friendlier adhesives.
The Rest: The outer elastic closure is covered with 100% organic cotton. Inside, the ribbon bookmark is made of 100% organic cotton. The band wrapping the book is made of 100% post-consumer recycled paper stock, printed with vegetable-based inks.
How cool is that? I'm really excited to get to use these. I haven't had a journal in FOREVER!!! I guess my blog has been like my journal. But now maybe I'll actually write some of my more private thoughts down, since I have such a convenient place to put them :)
Well, that's about all. Matt is taking a double-time shift tonight, so, after getting off work at 3 pm this afternoon and working out, he's catching a bit of sleep before he has to go back to work at 11pm (until 7am). I don't think I'll be able to stay up the whole time tonight, but I'll stay up late so I can be on at least a similar schedule.
I'll have to do a garden update, but I don't have pictures yet. Maybe I'll take them tomorrow. My transplanted strawberry bed is doing great, the watermelon/cantelopes finally sprouted and are doing well; the zucchini/squash are doing fantastic. I've harvested radishes already, and boy were they yummy! A lot of my other stuff has sprouted. The beans and peas are growing nicely. I'll definitely take pictures tomorrow and show you all.
Thanks for reading!
~Pam
I just finished crocheting this beanie :) Love it! It was a really simple pattern that I got for free from Lion Brand Yarn. Took me just a few hours; I worked on it a little bit last night and finished up this afternoon. Nice!

This is a project that I started. I saw a tutorial on turning scrapbook paper into fabric pillows, using a lightbox and tracing {obviously I don't have a lightbox. I taped it all to the window and traced away!}.

This necklace is made out of magazine paper, rolled into beads. I tried to find colors from the magazine in similar shades, and settled on the yellow/orange tones. I actually like it a lot, and it didn't take me that long to make it, either. I just strung it on a piece of yarn, so it's not going to last forever, but, hey! I'm alright with that. This magazine would have ended up in the recycling anyways :)


My Grapefruit Essential Oil experiment is coming along. The grapefruit peels are drying; it is taking a while, but that is to be expected. Every once in a while I get a whiff of grapefruit somewhere in the house and it makes me smile; I know where that's coming from! :)
Oh, did I mention that I won two different giveaways? Last week I entered a bunch of giveaways for fun, and I actually won. Twice! I never win anything! The first thing that I won was a sample of Shaklee Basic H2, which is an organic super cleaning concentrate. I won it in a giveaway from Someone's Gotta Pay.

The second giveaway was from one of my favorite crafting sites: Chica and Jo. They were doing an Earth Day giveaway, and I was one of the winners! I got this awesome sketchbook and journal :) They make me happy!

So, about the sketchbook. From the packaging:
"The Sketchbook is made from 100% post consumer recycled paper. 100% Made in the USA
The Cover is 100% recycled board covered with 100% recycled post-consumer recycled paper stock, dyed with vegetable based ink.
The Paper is 100% post-consumer, acid-free, Process Chlorine Free paper stock. Printed with vegetable -based inks and bound utilizing environmentally friendlier adhesives.
The Rest: The outer elastic closure is covered with 100% organic cotton. Inside, the ribbon bookmark is made of 100% organic cotton. The band wrapping the book is made of 100% post-consumer recycled paper stock, printed with vegetable-based inks.
How cool is that? I'm really excited to get to use these. I haven't had a journal in FOREVER!!! I guess my blog has been like my journal. But now maybe I'll actually write some of my more private thoughts down, since I have such a convenient place to put them :)
Well, that's about all. Matt is taking a double-time shift tonight, so, after getting off work at 3 pm this afternoon and working out, he's catching a bit of sleep before he has to go back to work at 11pm (until 7am). I don't think I'll be able to stay up the whole time tonight, but I'll stay up late so I can be on at least a similar schedule.
I'll have to do a garden update, but I don't have pictures yet. Maybe I'll take them tomorrow. My transplanted strawberry bed is doing great, the watermelon/cantelopes finally sprouted and are doing well; the zucchini/squash are doing fantastic. I've harvested radishes already, and boy were they yummy! A lot of my other stuff has sprouted. The beans and peas are growing nicely. I'll definitely take pictures tomorrow and show you all.
Thanks for reading!
~Pam
Wednesday, April 27, 2011
Another T-shirt remake: Three T-shirts = 1 cute ruffled skirt
So, a few days ago, I was blog cruising, aka looking at other people's blogs to see what ideas I could steal come up with, and I came across a tutorial for an Anthropologie skirt knock-off. I have to admit, I'd never even heard of Anthropologie before I started reading other people's blogs, and I would have to say that I probably like most of their stuff since I want to try to knock off so many ideas of theirs that I see. Anyways, the tutorial from Ruffles and Roses inspired me, and Holy Craft gave me the idea to use t-shirts to do it at this tutorial.
So: Here's the skirt. I love it!
 Want to see how I did it? I have a few (very few, sorry! The other tutorials are much better than mine, so if you want to see more details, check them out!)
First of all, I started with 3 large t-shirts. One dark grey, one light grey, and one black. The dark grey one was the one I was going to make the base of my skirt, and it was an XL or XXL (found these at the thrift store, in the men's section. Total cost: $2.75 :)
 I cut off the bottom of the dark grey shirt. This ended up being just the right length for me. I was going to add some length to the bottom with ruffles, so I wasn't too concerned about it being too short. It's probably a good thing I'm not very tall (5'6'').
 Ok, this picture is hard to see what's going on, but I basically laid a skirt that I knew fit me on top of my skirt base, and traced around it, leaving a seam allowance, then cut away the excess. Then, with right sides together, I sewed up the sides. Easy!
 Next, I started working on my first ruffle. I wanted the bottom ruffle to be black, so I took the black t-shirt and cut a 4" wide section off the bottom. I cut one end of the "loop" to make a long strip, but I knew based on the size of my black shirt vs. the skirt it wasn't going to be quite long enough. So, I cut another 4" wide section and sewed them together. Using a gathering stitch, I ran a stitch down the top, then pulled the top thread to gather. It's hard to see, but this is the ruffle....
 Ok, then I sewed the ruffle onto the bottom of the skirt (this picture is upside down, but you get the idea, right?) I sewed it onto the right side of the skirt, since the seam was going to be hidden by the next ruffle.
 Ok, I skipped a few steps in the pictures here. Sorry! In between, I cut a 4" wide strip of the light grey, made a ruffle that went just halfway around the skirt, and sewed it on top of the black ruffle. Then I cut a 4" wide strip of the dark grey, and made a ruffle slightly smaller than the light grey ruffle, and sewed it on top of the light grey. Here's a picture of the dark grey ruffle getting sewn on.
 Finally, I cut a last 4" strip of black shirt, made a ruffle that went around the whole thing, and sewed it to the top. However, this time, I sewed it upside down on top of the dark grey ruffle, so that it would fold down over the seams and hide them. does that make sense? See the Ruffles and Roses tutorial: she has much better pictures than I do.
And again, my finished skirt.


 And, my ever-present dilema: what shoes do I wear with it? :P
I'm actually really happy how it came out. The ruffle is so fun! That's my first real time doing a ruffle, and I had to make quite a few, so I got a lot of practice. I'm thinking I could do this skirt in a bunch more colors and fabrics, as well....hmmm....we'll see if I have time :)
~Pam
Linking up:
PS. As a side note, another project I'm working on is making grapefruit essential oil. Condo Blues had a tutorial on how to make Orange Essential Oil, and I thought it would be the perfect solution to my grapefruit problem (namely, what in the world to do with all the grapefruits on my tree. I can't eat THAT many of them!). The first step is to take the grapefruit peels and let them lay out to dry. I did that today. Now just wait a week (gulp! a week?) until they are solid. *sigh* I'll keep you posted on the progress :)
So: Here's the skirt. I love it!

First of all, I started with 3 large t-shirts. One dark grey, one light grey, and one black. The dark grey one was the one I was going to make the base of my skirt, and it was an XL or XXL (found these at the thrift store, in the men's section. Total cost: $2.75 :)


And again, my finished skirt.


I'm actually really happy how it came out. The ruffle is so fun! That's my first real time doing a ruffle, and I had to make quite a few, so I got a lot of practice. I'm thinking I could do this skirt in a bunch more colors and fabrics, as well....hmmm....we'll see if I have time :)
~Pam
Linking up:
PS. As a side note, another project I'm working on is making grapefruit essential oil. Condo Blues had a tutorial on how to make Orange Essential Oil, and I thought it would be the perfect solution to my grapefruit problem (namely, what in the world to do with all the grapefruits on my tree. I can't eat THAT many of them!). The first step is to take the grapefruit peels and let them lay out to dry. I did that today. Now just wait a week (gulp! a week?) until they are solid. *sigh* I'll keep you posted on the progress :)
T-shirt to Dress
Well, I was a little bit busy yesterday. I went to the thrift store, and spent about $10 buying some shirts. I had seen this tutorial for turning a tunic shirt into a dress, and I wanted to try my hand at it. I spent $2 for the supplies for this project ($1 each for the shirts). I couldn't quite find a tunic shirt like in the tutorial, but I shouldn't be surprised, because it is, after all, the thrift store. Here's pictures of my project:
Ok, first of all, here's the shirt. I actually kind of liked it, and would probably have kept it the way it was...those are polka dots, which I never wear.
 Step one: use seam ripper to take off the bottom of the shirt. I removed below the bottom of the band. The bottom of the shirt is going to be the bottom of the dress.
 Step two (not shown): Measure how long you want the finished dress to be, and figure out how much of the "t-shirt" or other material you need. Cut out that much material. I used a large black t-shirt, turned inside out so the logo on the shirt wouldn't show.
Step three: lay the black t-shirt material in between the top and bottom. Mark a line from the top to the bottom, giving yourself a seam allowance.
 Step four: Cut away excess. See the chalk line in the picture? That's where I decided to sew.
 Step five (not shown): Sew up the sides, and then attach the top to the middle and the middle to the bottom.
And here's the finished product:
 Do you like it? I had to add some darts in the back to make it fit a little better. And I'm thinking I need a belt...maybe a thick red belt...Also, I'm not sure what shoes to wear with it! I'm kind of shoe poor at the moment...
I must say, this dress is very comfortable. I think it will become my around-the-house dress. I could wear this dress all the time. Actually, the last picture was taken this morning, and I'm still wearing the dress. I wore it half the day yesterday as well :)
Ok, all in all, I think this project was fairly easy. I think next time, I'll try to get some knit material for the middle section, instead of using t-shirt cotton. The top and bottom is knit, and it might be easier to work with the same material. I'm kind of learning as I go, you know?
~Pam
Linking up:

Ok, first of all, here's the shirt. I actually kind of liked it, and would probably have kept it the way it was...those are polka dots, which I never wear.


Step three: lay the black t-shirt material in between the top and bottom. Mark a line from the top to the bottom, giving yourself a seam allowance.


And here's the finished product:

I must say, this dress is very comfortable. I think it will become my around-the-house dress. I could wear this dress all the time. Actually, the last picture was taken this morning, and I'm still wearing the dress. I wore it half the day yesterday as well :)
Ok, all in all, I think this project was fairly easy. I think next time, I'll try to get some knit material for the middle section, instead of using t-shirt cotton. The top and bottom is knit, and it might be easier to work with the same material. I'm kind of learning as I go, you know?
~Pam
Linking up:
Subscribe to:
Posts (Atom)