A company called FastMac has released a product called a "U-Socket" (link) which is a power outlet with two usb outlets on it for charging any devices that accept this method of charging (most new cellphones, tablets, etc.) One of the largest concerns with this method is that you can never unplug the usb power adapter, so there will always be some energy draw. I was concerned with the energy draw and wanted to compare it to my HTC EVO's standard USB adapter.
U-Socket Draw with nothing plugged in: .8ma (.8ma x 115V = .092Watts)
HTC USB adapater with nothing plugged in: 2ma (2ma x 115V = 0.23Watts)
In conclusion FastMac did a very nice job of keeping the Vampire draw to a minimum. You are looking at almost a year and a half before it uses 1 kwh, so this convenience is costing me less a penny per month in wasted electricity.
As for the installation I had no problem cramming it in to an old box that is original to my house, but your mileage may vary, the outlet is huge compared to a standard one. If you don't feel comfortable with the fact that electricity can kill hire some one to do it for you.
-Matt Emerson
This is a blog about our life: cycling, school, work, home improvement, family, and our efforts at becoming self-sufficient.
Contributors
Sunday, May 29, 2011
Sunday, May 15, 2011
Dear NRA...
We get called by the NRA 1-703-291-9005 multiple times each day, and they just hang up on us over and over again. I can't even hear their message or ask to be removed, so what I have decided is that every time in that NRA's lousy automated system calls me I am going to donate to The Brady Campaign Against Gun Violence (http://www.bradycampaign.org/) which is as close to the exact opposite of your groups beliefs that I can find. So please keep calling me and hanging up, and I will keep donating to the people you oppose.....
-Matt
-Matt
Saturday, May 14, 2011
Two Summer Dresses
Ok, so the other day, I was inspired when I saw this dress by EmersonMade, a clothing company that just happens to have a similar name to me, no relation ;) I saw the dress and thought "I think I could make something similar." That looks like a button down shirt turned dress. So, Matt and I went shopping at my favorite Thrift Store, and came back with two Extra Large men's button down shirts. These things were HUGE! I started out with the short sleeved shirt, which was huge. I don't have many pictures, because I wasn't sure how it would turn out.
This is what I started with.
And here's the other long sleeved shirt to start with.
These pictures are horrible, I know. But my husband was either sleeping (he was working the night shift) or working (working a double shift) so I had to take them myself in the mirror. But, you get the idea, right? I made sure the shirts were long enough to make a decent length dress.
The first thing I did was cut the sleeves off. They're ungainly and make it hard to fold the shirt in half to cut it.
For the plaid dress (the first one I did), folded the shirt in half, laid a tank top over it as a guide for the top, traced around it, and cut out a dress shape. For the second dress, I laid the first completed dress on top as a guide, since I already knew I liked the shape.
Then, I pinned up the sides, to make sure it fit nicely, and here's a picture of that.
Then, I sewed up the sides, making sure to leave the arm holes open ;) (sometimes I forget, but that's what a seam ripper is for, right?)
I still wasn't quite happy with how it fit, so I had to sew two darts on the back (of each dress, coincidentally). I used this tutorial. And this one. It made the fit just that much better. The last step is finishing up the arm holes and the neck holes. I just folded over and sewed :)
For the plaid dress, I had to do a little extra: I didn't like how "loose" the button line was, I felt like the dress was going to blow open on me. So, starting halfway down the dress, I topstitched it closed (halfway down, so I could get the dress on over my hips.). I didn't need to do it with the purple dress. It was pretty secure. Also, with the plaid dress, I cut a "v" in the back so I can move a little more freely. It ended up tighter than the purple, which doesn't need a "v"
I'm really happy with how they turned out. When asked, my husband said he couldn't believe I and made them, and they definitely didn't look like they used to be men's shirts either. :) I'm thinking of changing out the buttons to something more exciting than small clear buttons...something fun, perhaps?
~Pam
This is what I started with.
And here's the other long sleeved shirt to start with.
These pictures are horrible, I know. But my husband was either sleeping (he was working the night shift) or working (working a double shift) so I had to take them myself in the mirror. But, you get the idea, right? I made sure the shirts were long enough to make a decent length dress.
The first thing I did was cut the sleeves off. They're ungainly and make it hard to fold the shirt in half to cut it.
For the plaid dress (the first one I did), folded the shirt in half, laid a tank top over it as a guide for the top, traced around it, and cut out a dress shape. For the second dress, I laid the first completed dress on top as a guide, since I already knew I liked the shape.
Then, I pinned up the sides, to make sure it fit nicely, and here's a picture of that.
Then, I sewed up the sides, making sure to leave the arm holes open ;) (sometimes I forget, but that's what a seam ripper is for, right?)
I still wasn't quite happy with how it fit, so I had to sew two darts on the back (of each dress, coincidentally). I used this tutorial. And this one. It made the fit just that much better. The last step is finishing up the arm holes and the neck holes. I just folded over and sewed :)
For the plaid dress, I had to do a little extra: I didn't like how "loose" the button line was, I felt like the dress was going to blow open on me. So, starting halfway down the dress, I topstitched it closed (halfway down, so I could get the dress on over my hips.). I didn't need to do it with the purple dress. It was pretty secure. Also, with the plaid dress, I cut a "v" in the back so I can move a little more freely. It ended up tighter than the purple, which doesn't need a "v"
I'm really happy with how they turned out. When asked, my husband said he couldn't believe I and made them, and they definitely didn't look like they used to be men's shirts either. :) I'm thinking of changing out the buttons to something more exciting than small clear buttons...something fun, perhaps?
~Pam
Friday, May 6, 2011
My {first} Pillow!
Ok, here she is. My first pillow. :)
I love it.Want to know how I made this? Well, I got the inspiration from the crafty cpa. The paper she used was so cute, and totally inspired me to do something like that. Of course, I had to do my own take :) I'm new to making pillows, and this was a great first project for me.
Ok, so this is ridiculously easy. Here's what you need:
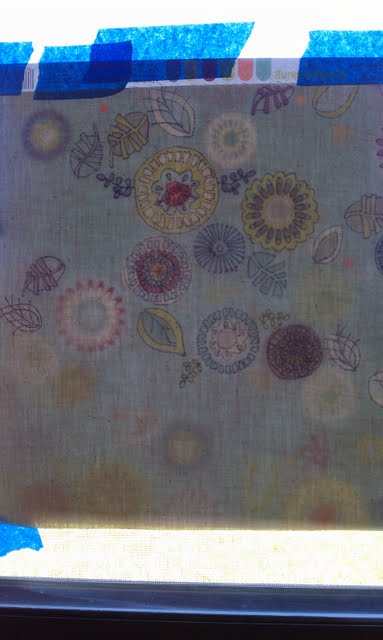
Next, you'll need to trace the design onto your fabric. Now, the crafty cpa used a light box to trace her paper, but I don't have a light box. I simply taped the paper to the window, and then the fabric over it. Like so...
You don't have to trace it all, and you don't have to stick with the design of the paper. I liked the flowers of this, but thought some of them were too busy for what I was going for. I traced around the outside of them, and put them all in a line, at different heights. I had to extend the stems of some of the flowers, and add leaves, but that wasn't too hard.
Once you have the design the way you want it, shade as needed. I traced in yellow around the flowers, and traced the stems and leaves in green.
Now, make your pillow. I just put right sides together, pinned, sewed around three sides and most of the fourth side, leaving enough to turn inside out. I ironed the seams down, and turned it. I filled with fiber fill, trying to make sure my pillow wasn't too lumpy. Then, I hand-sewed the opening shut. And Viola'!
A nice, fun pillow. Might make a good mother's day gift. Super easy, fast, and fun! :) Oh, and this pillow cost me probably about $1 total. :)
~Pam
Linking up:
I love it.Want to know how I made this? Well, I got the inspiration from the crafty cpa. The paper she used was so cute, and totally inspired me to do something like that. Of course, I had to do my own take :) I'm new to making pillows, and this was a great first project for me.
Ok, so this is ridiculously easy. Here's what you need:
- semi-see-through fabric (I used muslin. I got it at JoAnn's for about $1.79 a yd)
- cute scrapbook paper, with a design you like (this paper is for a different pillow I'm making)
- sharpies (ultra-fine tip for the tracing, fine tip for the shading)
- sewing machine (and needle and thread to hand stitch up the opening
- fiber fill (or pillow form)
- iron
Next, you'll need to trace the design onto your fabric. Now, the crafty cpa used a light box to trace her paper, but I don't have a light box. I simply taped the paper to the window, and then the fabric over it. Like so...
You don't have to trace it all, and you don't have to stick with the design of the paper. I liked the flowers of this, but thought some of them were too busy for what I was going for. I traced around the outside of them, and put them all in a line, at different heights. I had to extend the stems of some of the flowers, and add leaves, but that wasn't too hard.
Once you have the design the way you want it, shade as needed. I traced in yellow around the flowers, and traced the stems and leaves in green.
Now, make your pillow. I just put right sides together, pinned, sewed around three sides and most of the fourth side, leaving enough to turn inside out. I ironed the seams down, and turned it. I filled with fiber fill, trying to make sure my pillow wasn't too lumpy. Then, I hand-sewed the opening shut. And Viola'!
A nice, fun pillow. Might make a good mother's day gift. Super easy, fast, and fun! :) Oh, and this pillow cost me probably about $1 total. :)
~Pam
Linking up:
Wednesday, May 4, 2011
Clothespin Holder {A Mother's Day Tribute}
My Mom, last year at Lindsay's wedding
Isn't she beautiful?
I remember growing up in Menan, and every spring/summer/fall my mom would hang laundry up on the line. I remember there always being clothes on the line, drying. With 8+ people in the house at any one time, there was always tons of laundry to do. Our clothesline was huge. The lines were long and very sturdy. They seemed to be really high, too, but that might be because I was so little when we lived there. I especially liked to help out putting up towels or taking them down. They were the easiest! I remember having to run out and bring them all in really quick when an afternoon thundershower would roll through, which happened often enough. Yes, the clothes, especially the jeans, ended up slightly stiffer than they would coming out of the dryer, but nothing beats the smell of fresh laundry, right off the line. So, Mom, this post is for you! Happy Mother's Day :)
Now that it is May, and my husband set up the clothesline, I decided I wanted to start drying clothes out on the line. Yesterday I ended up doing two full loads of laundry, and drying them on the line. It was so warm and dry outside that I think it took less time for most of the clothes to dry than it would have in the dryer :)
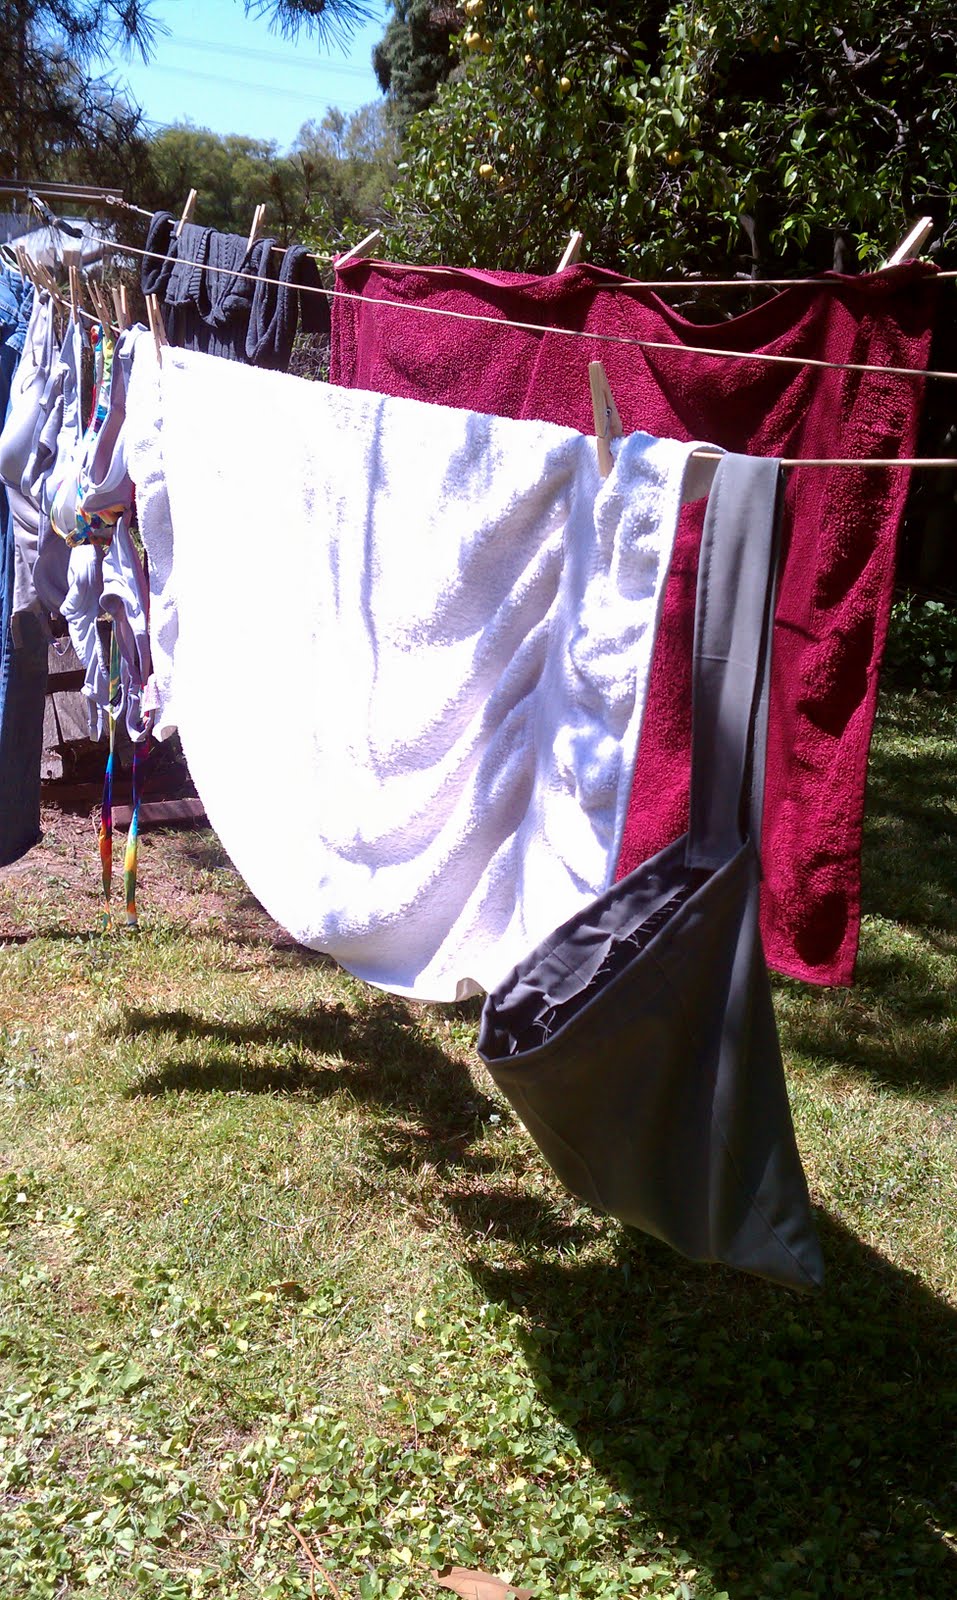
Here's my clothesline. There are three lines at the moment, but there's room for two more...I'm thinking I'll have Matt hook me up and put up the last two lines :)
OK, I have a confession to make. I didn't have clothespins yesterday when I put the clothes on to wash. I had to make a run to the store to find some. I spent $3 on 75 clothespins, and I'm thinking I could probably use 2 more...But I didn't have a place to put my pins. So I decided to make myself a clothespin holder.
I got some ideas from one of my crafting newsletters. Yesterday's post was all about clothespin holders. I decided on this idea, using a placemat to make a holder. Unfortunately, I couldn't find a placemat that I wanted to use, so I actually used some of my scraps and used a pant leg from a pair of old pants of Matt's.
First, I cut out a section of the pant leg. I didn't use the very bottom, although that would have been nice since there's already a seam there...but, no, I decided it wasn't a big enough "pocket". I turned it inside out, sewed the bottom (in this case, the skinnier side. The pant leg kind of tapered, and I wanted the wider side to be the opening.), and turned it right side out. I wanted the seams to look sort of finished, so I folded down the top, and topstitched one line all the way around. Then, I turned it inside out, and stitched close to the "cut" edge. {Does that make sense?} I have black thread in the top of my machine, and gray thread in the bobbin (don't ask) and that makes for some varied stitching :) You can see in the picture it is still a little raw, but I figured that would be ok.
See the two different colored stitches?
Ok, for the handle, I took a 2 1/2" section of the pant leg, cut it down to where I thought would make a good handle, sewed around all the edges. Then I sewed it onto the back of the bag. I used a zigzag stitch, plus topstitched with a straight stitch all around the edges. I want to make sure that baby stays on! I then attached velcro to the inside, right on top of where the handle attaches. I put the other side of the velcro on the end of the handle.
All in all, this took me about 20 minutes, and by the time the clothes were done drying, my clothespin bag was ready to hold clothespins for me :)
There it is :) I like this idea better than the ones with a clothes hanger to hold it on the line, mainly because I don't have any clothes hangers, and also because it will NOT fall off the line :) I slide it right down the line with me as I go, and it makes my life easier! I don't think my mom ever had a holder, or at least I don't remember one. The pins would just stay on the line, spread out, and they'd be there to use as needed. Maybe it didn't get as dusty in Menan as it does here in LA, but I'm thinking that to keep my pins clean, I'll need to keep them inside :)
One thing I kept thinking as I was hanging the clothes out was that the energy that was drying the clothes was totally free. Love it!
~Pam
Linking Up!

Sunday, May 1, 2011
May Day Garden Update
Happy May Day everyone! {Or Beltane, if you prefer :}
So, I decided that a pictorial update on the garden might be in order. Most of this stuff I planted back in February, and have been continuously adding since. So, without further ado, here it is...My Garden :)
Here's looking out at the 4 raised beds in the yard.
Here's some closeups: This is watermelons and cantelopes.
Here's yellow squash, zucchini, and winter squash, plus some romaine lettuce.
Matt's Amarinth and tomatoes.
Matt's corn. It's going crazy!
The newest bed: strawberries and herbs.
Here you can see strawberries in the foreground, and two types of basil and rosemary in the background.
More strawberries. I planted 18 strawberry plants. Some of them are runner producing, some aren't, but they are all everbearing. I counted 12 strawberry fruits growing just today!
Here's some beans, peas, radishes, lettuce, and a few carrots.
Don't they look yummy! I'm actually going to roast them in the oven right now, and we'll eat them with some grilled chicken and sauteed asparagus that we got from our shipment of veggies from Farm Fresh To You. What a neat company. We get a box about once every 4 weeks, and it's only $31.50. Can't beat that for organic produce right to our door. We love it! :)
Anyways, I need to get dinner going, so I'll wrap this up. Hope you enjoyed reading about my garden. I'm lovin' it!
~Pam
So, I decided that a pictorial update on the garden might be in order. Most of this stuff I planted back in February, and have been continuously adding since. So, without further ado, here it is...My Garden :)
Here's looking out at the 4 raised beds in the yard.
Here's some closeups: This is watermelons and cantelopes.
Here's yellow squash, zucchini, and winter squash, plus some romaine lettuce.
Matt's Amarinth and tomatoes.
Matt's corn. It's going crazy!
The newest bed: strawberries and herbs.
Here you can see strawberries in the foreground, and two types of basil and rosemary in the background.
More strawberries. I planted 18 strawberry plants. Some of them are runner producing, some aren't, but they are all everbearing. I counted 12 strawberry fruits growing just today!
Here's the original square foot garden from this past fall/winter. There's a lot going on :)
Here we have romaine lettuce, onions, peas, marigolds, and some sprouts of something...can't remember right now! Here's some beans, peas, radishes, lettuce, and a few carrots.
And, the pie'ce de re'sistance: Potatoes. :)
I was trying to help out one of the plants today that had fallen over in the wind, and I actually skewered a new potato, so I decided to harvest them :) Don't they look yummy! I'm actually going to roast them in the oven right now, and we'll eat them with some grilled chicken and sauteed asparagus that we got from our shipment of veggies from Farm Fresh To You. What a neat company. We get a box about once every 4 weeks, and it's only $31.50. Can't beat that for organic produce right to our door. We love it! :)
Anyways, I need to get dinner going, so I'll wrap this up. Hope you enjoyed reading about my garden. I'm lovin' it!
~Pam
Saturday, April 30, 2011
What I've been working on...
Ok, so after the skirt I made earlier this week, I decided to take a little break from sewing, and work on some other projects. Here's a bit of what I've been working on:
I just finished crocheting this beanie :) Love it! It was a really simple pattern that I got for free from Lion Brand Yarn. Took me just a few hours; I worked on it a little bit last night and finished up this afternoon. Nice!
{P.S. I look like a dork. I know. I can't help it! This is what I get when I take a self portrait :}
This is a project that I started. I saw a tutorial on turning scrapbook paper into fabric pillows, using a lightbox and tracing {obviously I don't have a lightbox. I taped it all to the window and traced away!}.
I've gotten to the point where my tracing is done, but now I have decisions to make on how to finish the pillows. This is only 12x12 square, which I think would make smallish pillows, so I think I'm going to have to relearn how to quilt and add a border all the way around to make it bigger before I make it into a pillow...more to come later!
This necklace is made out of magazine paper, rolled into beads. I tried to find colors from the magazine in similar shades, and settled on the yellow/orange tones. I actually like it a lot, and it didn't take me that long to make it, either. I just strung it on a piece of yarn, so it's not going to last forever, but, hey! I'm alright with that. This magazine would have ended up in the recycling anyways :)
One more project I'm working on is a waste basket made from magazine pages...I don't have a picture since I'm in the very early stages, but here's a link to where I got the inspiration. Because there aren't instructions on how exactly she made the basket, I'm kind of making it up as I go along. I'm not quite sure I like where it is going...it might just turn into something else. It is taking me a long time, and I'm not quite sure I have the patience.
My Grapefruit Essential Oil experiment is coming along. The grapefruit peels are drying; it is taking a while, but that is to be expected. Every once in a while I get a whiff of grapefruit somewhere in the house and it makes me smile; I know where that's coming from! :)
Oh, did I mention that I won two different giveaways? Last week I entered a bunch of giveaways for fun, and I actually won. Twice! I never win anything! The first thing that I won was a sample of Shaklee Basic H2, which is an organic super cleaning concentrate. I won it in a giveaway from Someone's Gotta Pay.
From the packaging: "Inside this tiny capsule is enough power to make a whole bottle of all-purpose super cleaner and another bottle of glass cleaner-16 earth-loving ounces each." Basically you use 2 drops mixed with 16 oz of water for glass cleaner, and the rest of the little bottle (about 1/4 tsp) with 16 oz for the multi-purpose cleaner. I have to admit I haven't tried it yet, because I don't have spray bottles, but I'm looking forward to trying it out.
The second giveaway was from one of my favorite crafting sites: Chica and Jo. They were doing an Earth Day giveaway, and I was one of the winners! I got this awesome sketchbook and journal :) They make me happy!
Don't mind the mess all around. My desk is driving me nuts and I'll get to it soon.
So, about the sketchbook. From the packaging:
"The Sketchbook is made from 100% post consumer recycled paper. 100% Made in the USA
The Cover is 100% recycled board covered with 100% recycled post-consumer recycled paper stock, dyed with vegetable based ink.
The Paper is 100% post-consumer, acid-free, Process Chlorine Free paper stock. Printed with vegetable -based inks and bound utilizing environmentally friendlier adhesives.
The Rest: The outer elastic closure is covered with 100% organic cotton. Inside, the ribbon bookmark is made of 100% organic cotton. The band wrapping the book is made of 100% post-consumer recycled paper stock, printed with vegetable-based inks.
How cool is that? I'm really excited to get to use these. I haven't had a journal in FOREVER!!! I guess my blog has been like my journal. But now maybe I'll actually write some of my more private thoughts down, since I have such a convenient place to put them :)
Well, that's about all. Matt is taking a double-time shift tonight, so, after getting off work at 3 pm this afternoon and working out, he's catching a bit of sleep before he has to go back to work at 11pm (until 7am). I don't think I'll be able to stay up the whole time tonight, but I'll stay up late so I can be on at least a similar schedule.
I'll have to do a garden update, but I don't have pictures yet. Maybe I'll take them tomorrow. My transplanted strawberry bed is doing great, the watermelon/cantelopes finally sprouted and are doing well; the zucchini/squash are doing fantastic. I've harvested radishes already, and boy were they yummy! A lot of my other stuff has sprouted. The beans and peas are growing nicely. I'll definitely take pictures tomorrow and show you all.
Thanks for reading!
~Pam
I just finished crocheting this beanie :) Love it! It was a really simple pattern that I got for free from Lion Brand Yarn. Took me just a few hours; I worked on it a little bit last night and finished up this afternoon. Nice!
{P.S. I look like a dork. I know. I can't help it! This is what I get when I take a self portrait :}
This is a project that I started. I saw a tutorial on turning scrapbook paper into fabric pillows, using a lightbox and tracing {obviously I don't have a lightbox. I taped it all to the window and traced away!}.
I've gotten to the point where my tracing is done, but now I have decisions to make on how to finish the pillows. This is only 12x12 square, which I think would make smallish pillows, so I think I'm going to have to relearn how to quilt and add a border all the way around to make it bigger before I make it into a pillow...more to come later!
This necklace is made out of magazine paper, rolled into beads. I tried to find colors from the magazine in similar shades, and settled on the yellow/orange tones. I actually like it a lot, and it didn't take me that long to make it, either. I just strung it on a piece of yarn, so it's not going to last forever, but, hey! I'm alright with that. This magazine would have ended up in the recycling anyways :)
One more project I'm working on is a waste basket made from magazine pages...I don't have a picture since I'm in the very early stages, but here's a link to where I got the inspiration. Because there aren't instructions on how exactly she made the basket, I'm kind of making it up as I go along. I'm not quite sure I like where it is going...it might just turn into something else. It is taking me a long time, and I'm not quite sure I have the patience.
My Grapefruit Essential Oil experiment is coming along. The grapefruit peels are drying; it is taking a while, but that is to be expected. Every once in a while I get a whiff of grapefruit somewhere in the house and it makes me smile; I know where that's coming from! :)
Oh, did I mention that I won two different giveaways? Last week I entered a bunch of giveaways for fun, and I actually won. Twice! I never win anything! The first thing that I won was a sample of Shaklee Basic H2, which is an organic super cleaning concentrate. I won it in a giveaway from Someone's Gotta Pay.
From the packaging: "Inside this tiny capsule is enough power to make a whole bottle of all-purpose super cleaner and another bottle of glass cleaner-16 earth-loving ounces each." Basically you use 2 drops mixed with 16 oz of water for glass cleaner, and the rest of the little bottle (about 1/4 tsp) with 16 oz for the multi-purpose cleaner. I have to admit I haven't tried it yet, because I don't have spray bottles, but I'm looking forward to trying it out.
The second giveaway was from one of my favorite crafting sites: Chica and Jo. They were doing an Earth Day giveaway, and I was one of the winners! I got this awesome sketchbook and journal :) They make me happy!
Don't mind the mess all around. My desk is driving me nuts and I'll get to it soon.
So, about the sketchbook. From the packaging:
"The Sketchbook is made from 100% post consumer recycled paper. 100% Made in the USA
The Cover is 100% recycled board covered with 100% recycled post-consumer recycled paper stock, dyed with vegetable based ink.
The Paper is 100% post-consumer, acid-free, Process Chlorine Free paper stock. Printed with vegetable -based inks and bound utilizing environmentally friendlier adhesives.
The Rest: The outer elastic closure is covered with 100% organic cotton. Inside, the ribbon bookmark is made of 100% organic cotton. The band wrapping the book is made of 100% post-consumer recycled paper stock, printed with vegetable-based inks.
How cool is that? I'm really excited to get to use these. I haven't had a journal in FOREVER!!! I guess my blog has been like my journal. But now maybe I'll actually write some of my more private thoughts down, since I have such a convenient place to put them :)
Well, that's about all. Matt is taking a double-time shift tonight, so, after getting off work at 3 pm this afternoon and working out, he's catching a bit of sleep before he has to go back to work at 11pm (until 7am). I don't think I'll be able to stay up the whole time tonight, but I'll stay up late so I can be on at least a similar schedule.
I'll have to do a garden update, but I don't have pictures yet. Maybe I'll take them tomorrow. My transplanted strawberry bed is doing great, the watermelon/cantelopes finally sprouted and are doing well; the zucchini/squash are doing fantastic. I've harvested radishes already, and boy were they yummy! A lot of my other stuff has sprouted. The beans and peas are growing nicely. I'll definitely take pictures tomorrow and show you all.
Thanks for reading!
~Pam
Subscribe to:
Posts (Atom)